This guide covers Free, Standard, Pro and Business. Each higher edition includes everything from the previous edition.
For quick answers, visit the FAQ. To browse by topic, return to the Help Center.
1. Getting started
NoviTaps brings together your menu source, layout, behavior and design. You can set defaults for all navigations, then adjust individual blocks, widgets or shortcodes where needed.
You need WordPress 6.6 or newer and PHP 7.4 or newer.
Elementor is optional. Install Elementor if you want to use the NoviTaps Elementor widget. Elementor Pro is not required.
| Edition | Main additions |
|---|---|
| Free | Four layouts, click opening, basic design, and all three ways to add navigation: block, shortcode and widget |
| Standard | Accordion, bottom navigation and rail layouts; responsive controls; hover opening; icons, badges, sticky navigation and design presets |
| Pro | Mega menus, floating bottom bar, animations, richer menu content, advanced design, custom items and visibility rules |
| Business | Saved navigation profiles, automatic placement, and import and export between websites |
2. Installation and licensing
Free
- In WordPress, open Plugins → Add New.
- Search for NoviTaps, then install and activate it.
- Open NoviTaps in the WordPress main menu.
Standard, Pro or Business
- After your purchase, download NoviTaps Premium with the link in your purchase email or from your Freemius customer portal.
- In WordPress, open Plugins → Add New → Upload Plugin, upload the ZIP file and activate it.
- Activate your license in the Freemius dialog.
- Open NoviTaps in the WordPress main menu.
If NoviTaps Free is installed, the premium plugin replaces it when you activate it. Your navigations and settings are kept.
Standard, Pro and Business use the same premium plugin. Your license determines which functions are available, so changing your edition never requires a different plugin. In the premium plugin, functions of a higher edition show the edition that unlocks them. Without an active license, the premium plugin offers the Free functions.
3. Find your way around NoviTaps
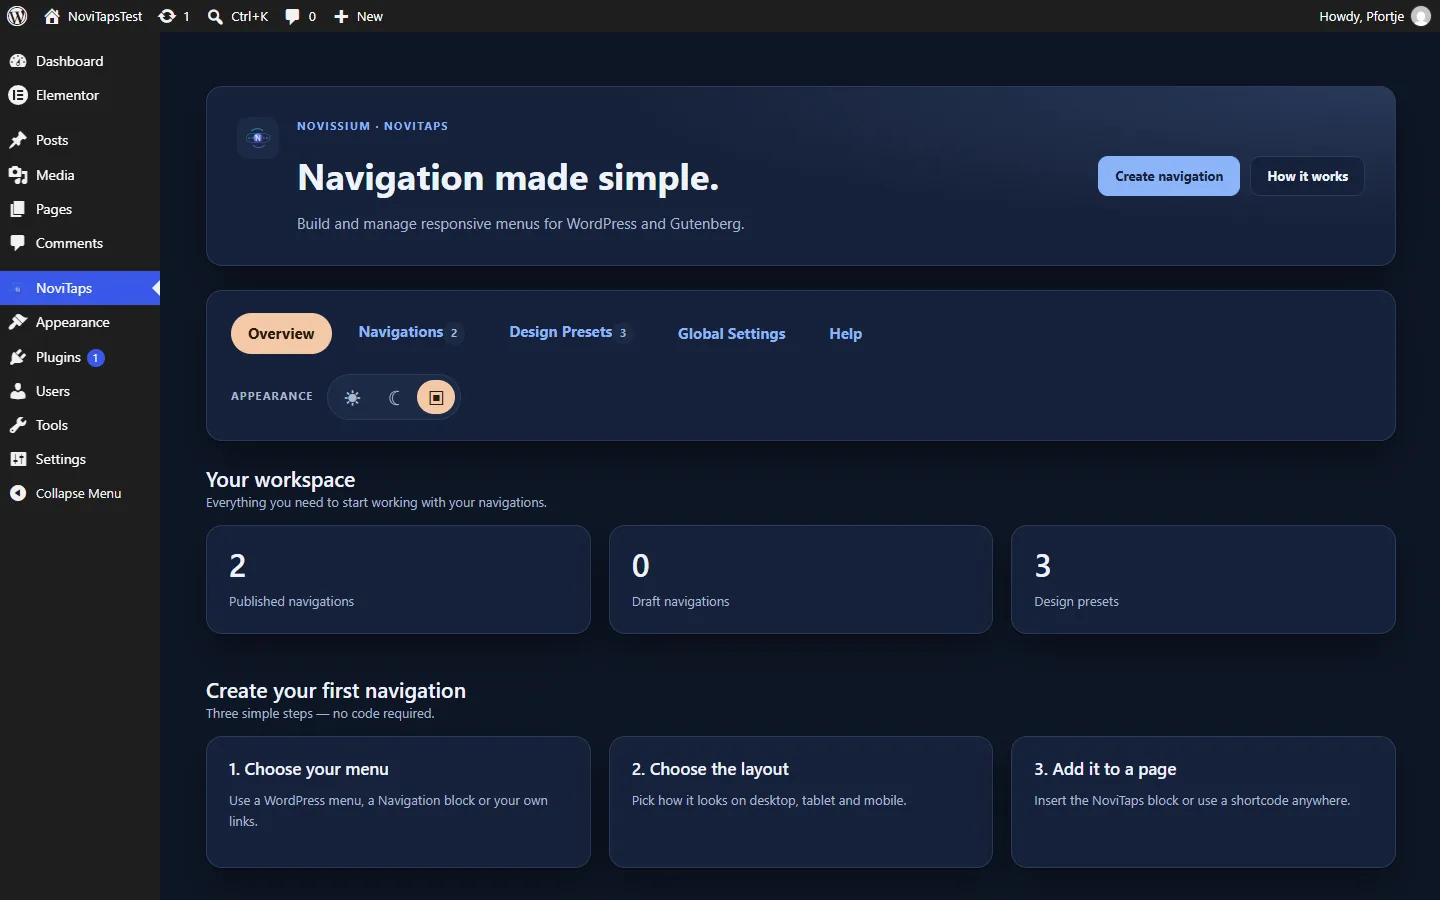
The NoviTaps main menu contains these tabs:
| Tab | What to look for |
|---|---|
| Overview | The NoviTaps overview |
| Navigations | Navigation editing; saved navigation profiles are a Business feature |
| Design Presets | Starter designs and your own design presets, available from Standard |
| Global Settings | Defaults for all navigations, with a live preview |
| Help | Help for NoviTaps |
Settings are organized into these groups:
| Group | What it covers |
|---|---|
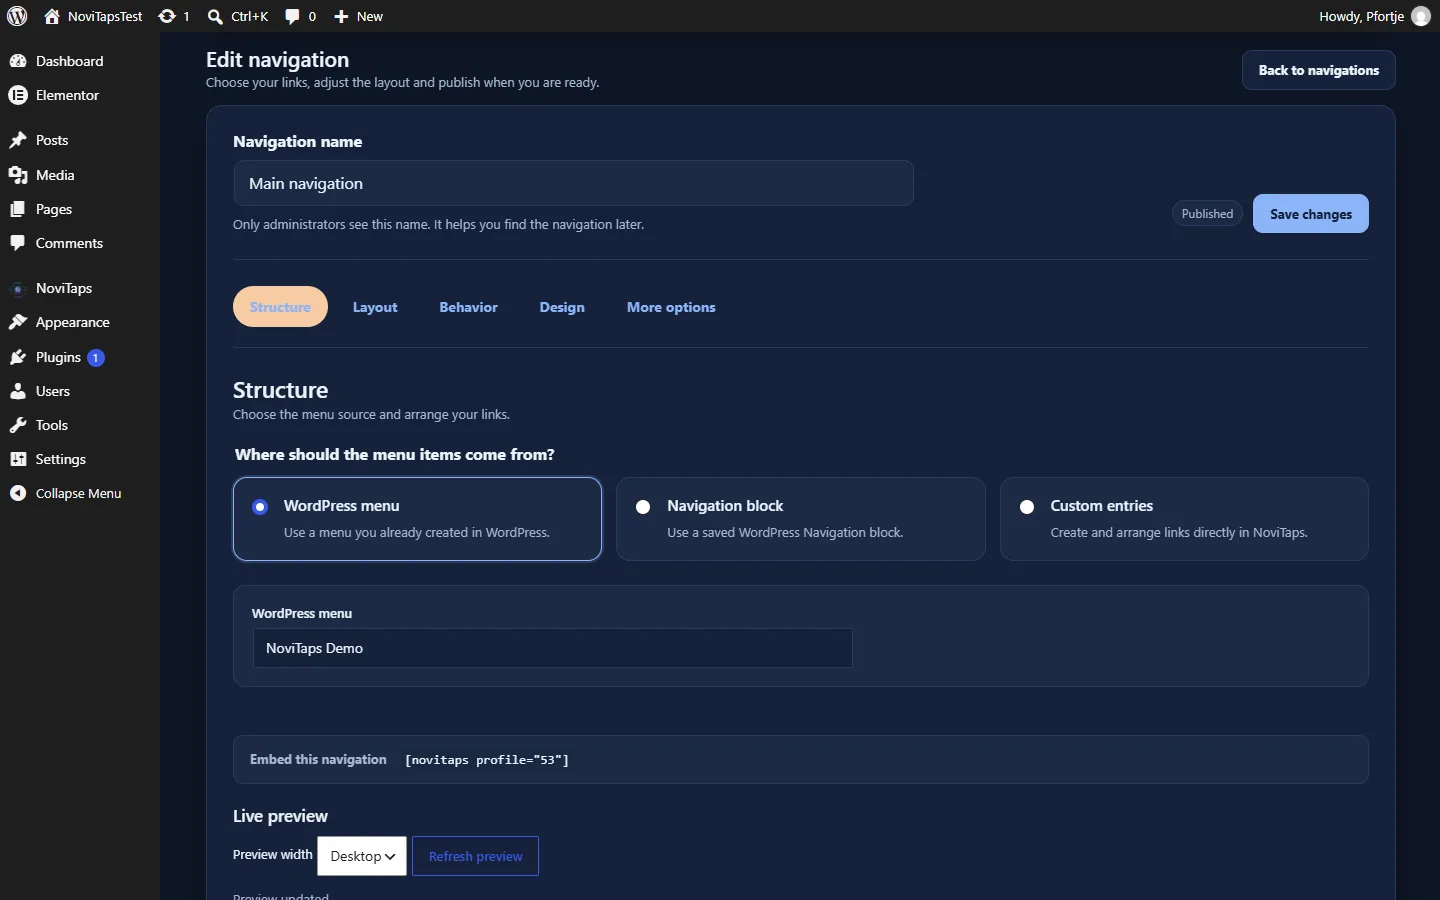
| Structure | Menu source and links |
| Layout | Desktop, tablet and mobile layouts |
| Behavior | How submenus open and other navigation behavior |
| Design | The menu, links and their states |
| More options | Accessibility, placement and special rules |
The available controls depend on your edition.
4. Set defaults for your navigations
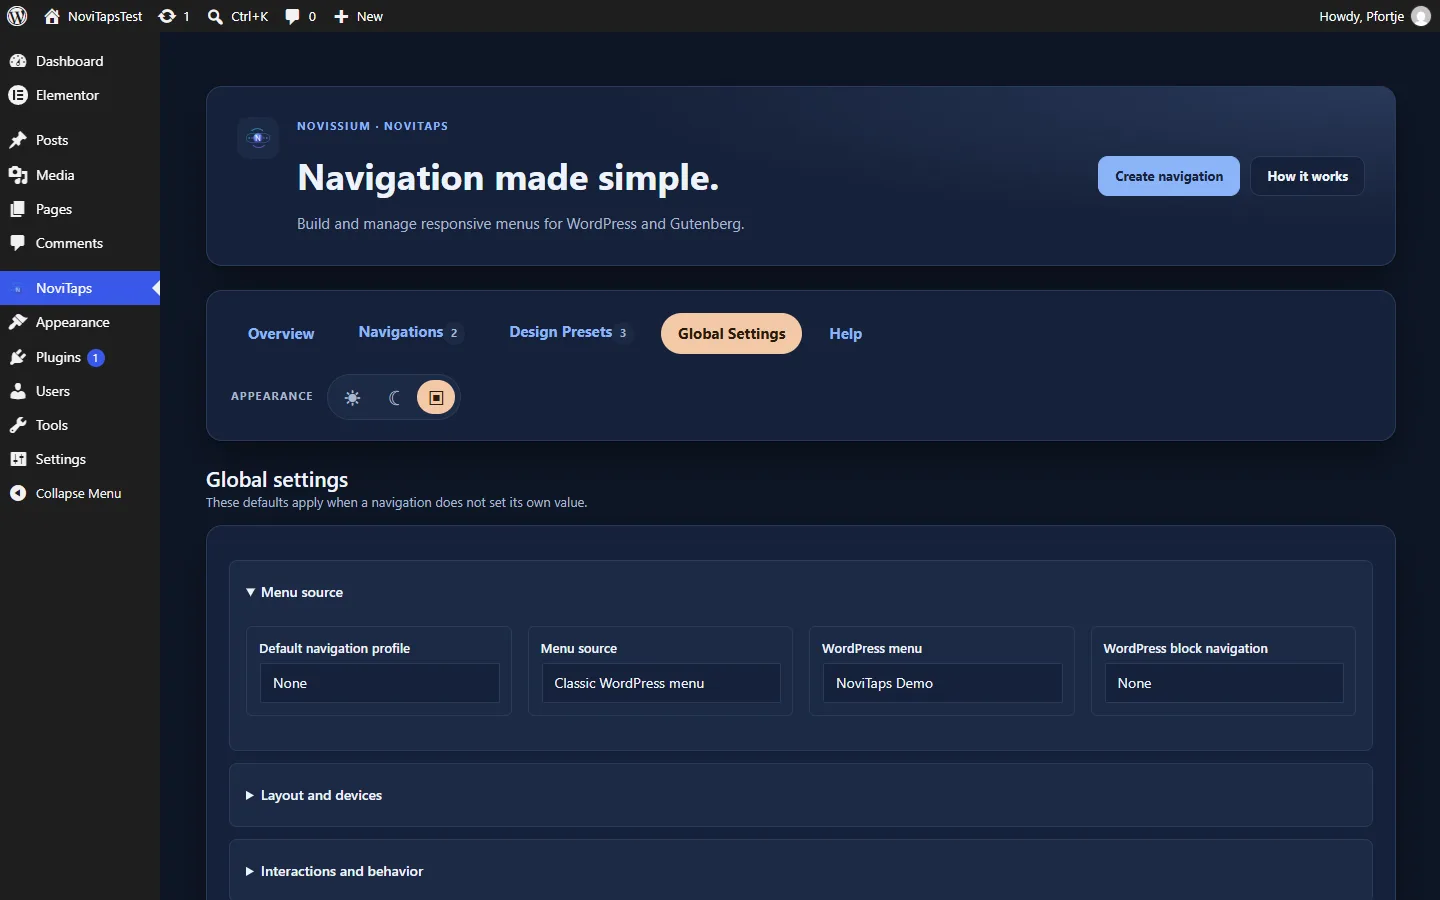
Global Settings applies to all navigations unless a block, widget or shortcode supplies its own setting.
- Open NoviTaps → Global Settings.
- Choose your menu source and links under Structure.
- Set the available device layouts under Layout.
- Adjust Behavior and Design.
- Review the result in the live preview and save your settings.
- Check any existing navigation that has its own overrides.
For example, you can use a shared layout globally and set one shortcode to vertical with [novitaps layout="vertical"].
5. Choose your menu source
Under Structure → Menu source you can choose:
| Choice | What it uses |
|---|---|
| Automatic (WordPress menu, then Navigation block) | The first WordPress menu that contains items. If there is none, the first Navigation block of your site. |
| Classic WordPress menu | The menu you select under WordPress menu. |
| WordPress block navigation | The Navigation block you select under WordPress block navigation. |
| Own entries | Entries you create in NoviTaps (Pro and higher). |
- Open the navigation settings you want to use, or Global Settings for shared defaults.
- Choose the Menu source under Structure.
- For a classic menu or a Navigation block, select the menu.
- Check the resulting links before publishing.
You edit the links of a WordPress menu as usual under Appearance → Menus (classic themes) or in the Site Editor (block themes).
From Pro, you can also build custom menu items instead of using a WordPress menu.
6. Add navigation in Gutenberg
Available in Free and higher.
- Open the page or post in the WordPress block editor.
- Add the NoviTaps Navigation block.
- Use your global defaults or adjust the available settings for this block.
- Check the menu source, links and layout.
- Preview the navigation and save or publish the page when ready.
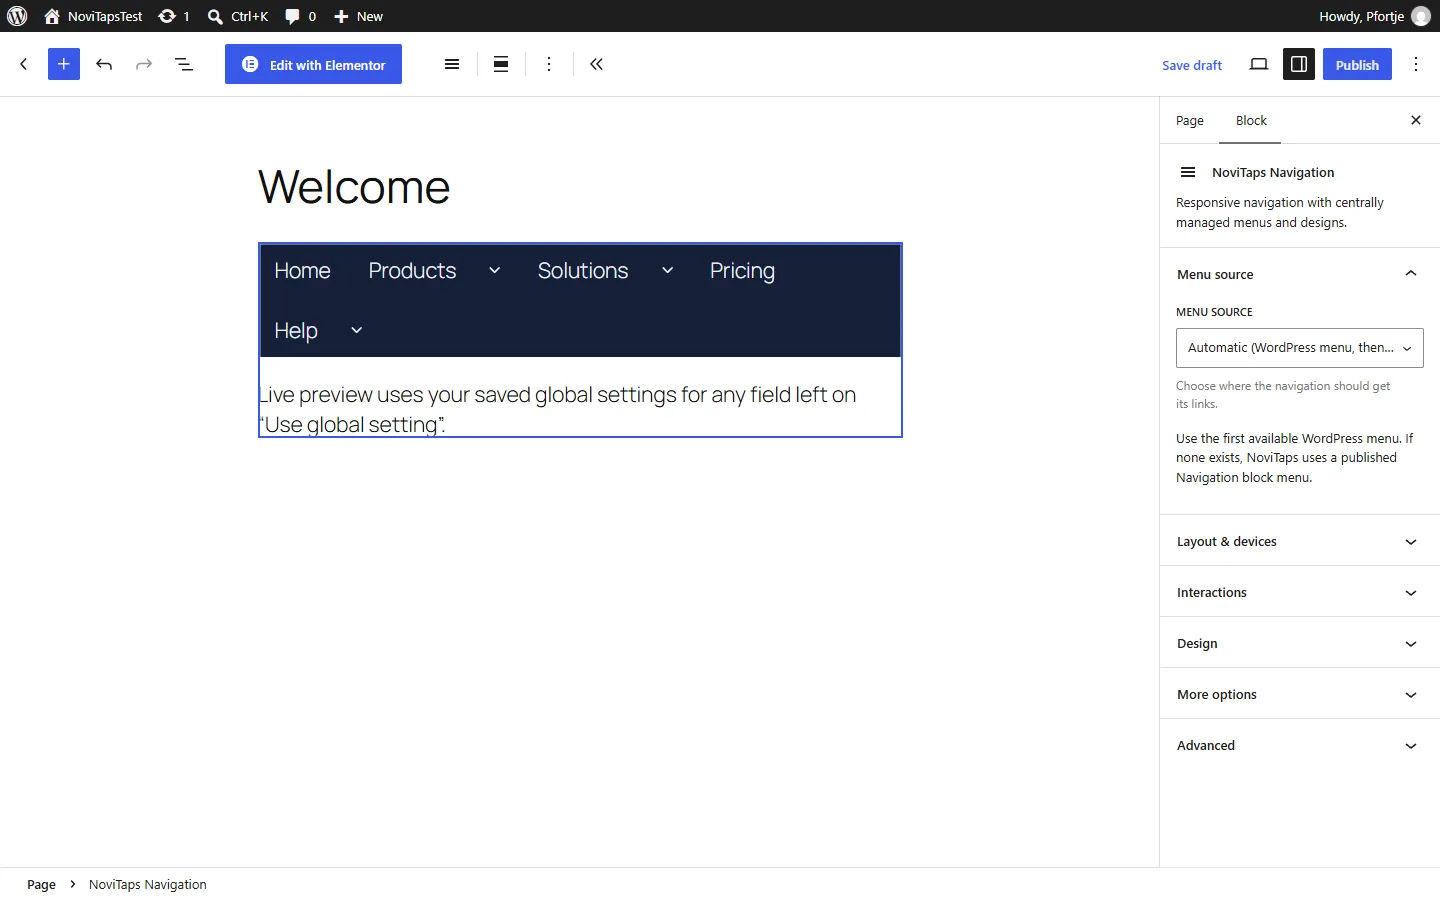
The NoviTaps Navigation block places your navigation on the page. A Navigation block can also serve as a menu source; these are separate choices.
7. Add navigation with a shortcode
Available in Free and higher.
- Open the content where you want to place navigation.
- Insert
[novitaps]in a location that supports WordPress shortcodes. - Add attributes for any settings you want to override.
- Preview the result and save your content.
Use the basic shortcode:
[novitaps]To choose a vertical layout:
[novitaps layout="vertical"]Settings supplied as shortcode attributes override the corresponding global settings. Common attributes:
| Attribute | Values |
|---|---|
layout |
horizontal, vertical, dropdown, offcanvas; from Standard also accordion, bottom, rail; from Pro mega |
source |
auto, classic, block |
menu |
The ID of a WordPress menu, used with source="classic" |
profile |
The ID of a saved navigation (Business), for example [novitaps profile="12"] |
Options that your edition does not include fall back to Free settings.
8. Add navigation in Elementor
Available in Free and higher. Elementor Pro is not required.
- Open the page in Elementor.
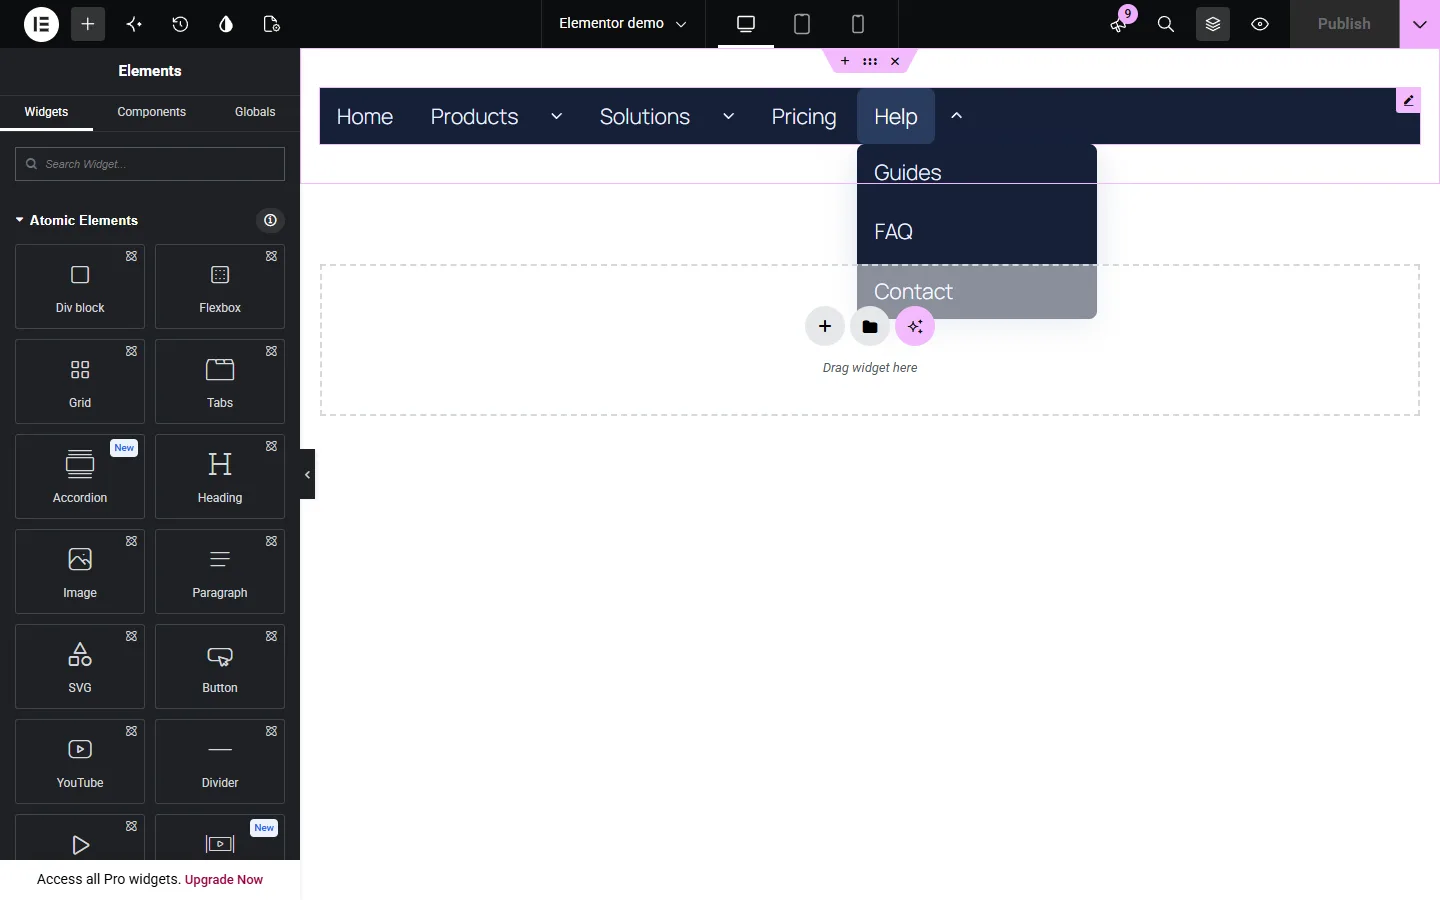
- Find NoviTaps Navigation in the widget list.
- Add the widget to your layout.
- Use your global defaults or adjust the available widget settings.
- Preview the navigation at different screen widths and save the page.
You can use the Gutenberg block or shortcode on websites without Elementor.
9. Choose a layout
| Layout | Minimum edition | Use it for |
|---|---|---|
| Horizontal | Free | Navigation arranged across the page |
| Vertical | Free | Navigation arranged down the page |
| Dropdown / flyout | Free | Menus with submenus that open from their parent items |
| Hamburger / off-canvas | Free | Navigation opened through a hamburger control |
| Sidebar accordion | Standard | Sidebar navigation with expandable sections |
| App bottom navigation | Standard | App-style navigation at the bottom of the screen |
| Navigation rail | Standard | Navigation in a rail layout |
| Mega menu | Pro | Expanded menu content, including Elementor templates |
- Open Layout in the relevant navigation settings.
- Choose a layout available in your edition.
- Adjust its available behavior and design options.
- Preview the result on desktop and mobile.
10. Set desktop, tablet and mobile layouts
In Free, horizontal and dropdown menus automatically become hamburger menus on mobile. The breakpoint is fixed.
From Standard, you can choose separate tablet and mobile layouts, set your own breakpoints and control tablet visibility.
- Open Layout.
- Choose the desktop layout.
- From Standard, choose the tablet and mobile layouts and adjust the breakpoints.
- From Standard, check the tablet visibility setting.
- Preview the navigation at each screen size and around each breakpoint.
11. Configure navigation behavior
Free includes:
- Opening submenus by click.
- One open branch per level and Open current page ancestors.
- Submenu alignment, Flyout side and Off-canvas side.
- Your own texts for the menu trigger and the More, Close and Back buttons.
- Visibility on desktop and mobile.
Standard adds:
- Hover opening.
- Icons and their position, plus badges.
- Hide-on-scroll behavior.
- Highlighting of the current section and an anchor offset.
- Sticky navigation with an offset.
- Bottom-bar controls described in the next section.
Pro adds:
- Opening and icon-hover animations.
- Descriptions, tooltips and avatars.
- Search within the menu.
- A floating bottom bar.
To adjust behavior:
- Open Behavior in your navigation settings.
- Choose how submenus should open.
- Adjust the available scrolling, section and sticky options you need.
- Preview the navigation and test its links and submenus.
12. Set up app bottom navigation
App bottom navigation requires Standard or higher.
Standard includes controls for the number of slots, labels and behavior when the on-screen keyboard is open. Pro adds a floating bottom bar.
- Choose App bottom navigation as the layout for the device where you want to use it.
- Set Visible bottom slots (including More). Entries that do not fit move into More.
- Turn Show icon labels on or off.
- Choose Bottom bar while typing for an open on-screen keyboard.
- In Pro or Business, turn on Floating bottom bar if required.
- Check the navigation on a mobile device, including with the keyboard open.
With own entries (Pro), Bottom navigation priority decides which entries stay visible in the bar.
13. Style your navigation
Free includes colors, typography, spacing, alignment and light, dark or automatic color mode. It also includes focus-state and focus-outline styling for accessibility.
Standard adds hover and active states, plus styling for icons, badges and the More and Back buttons.
Pro adds advanced width and height controls, borders, radius, glass effects, shadows, transparency, transitions and stacking order.
- Open Design.
- Set the colors, typography, spacing and alignment.
- Choose light, dark or automatic color mode.
- Adjust the focus state and outline so keyboard users can see which link has focus.
- From Standard, style the hover and active states and any icons, badges or More and Back buttons used by your navigation.
- From Pro, adjust dimensions and effects as needed.
- Preview the result and test the interaction states.
14. Use design presets
Requires Standard or higher.
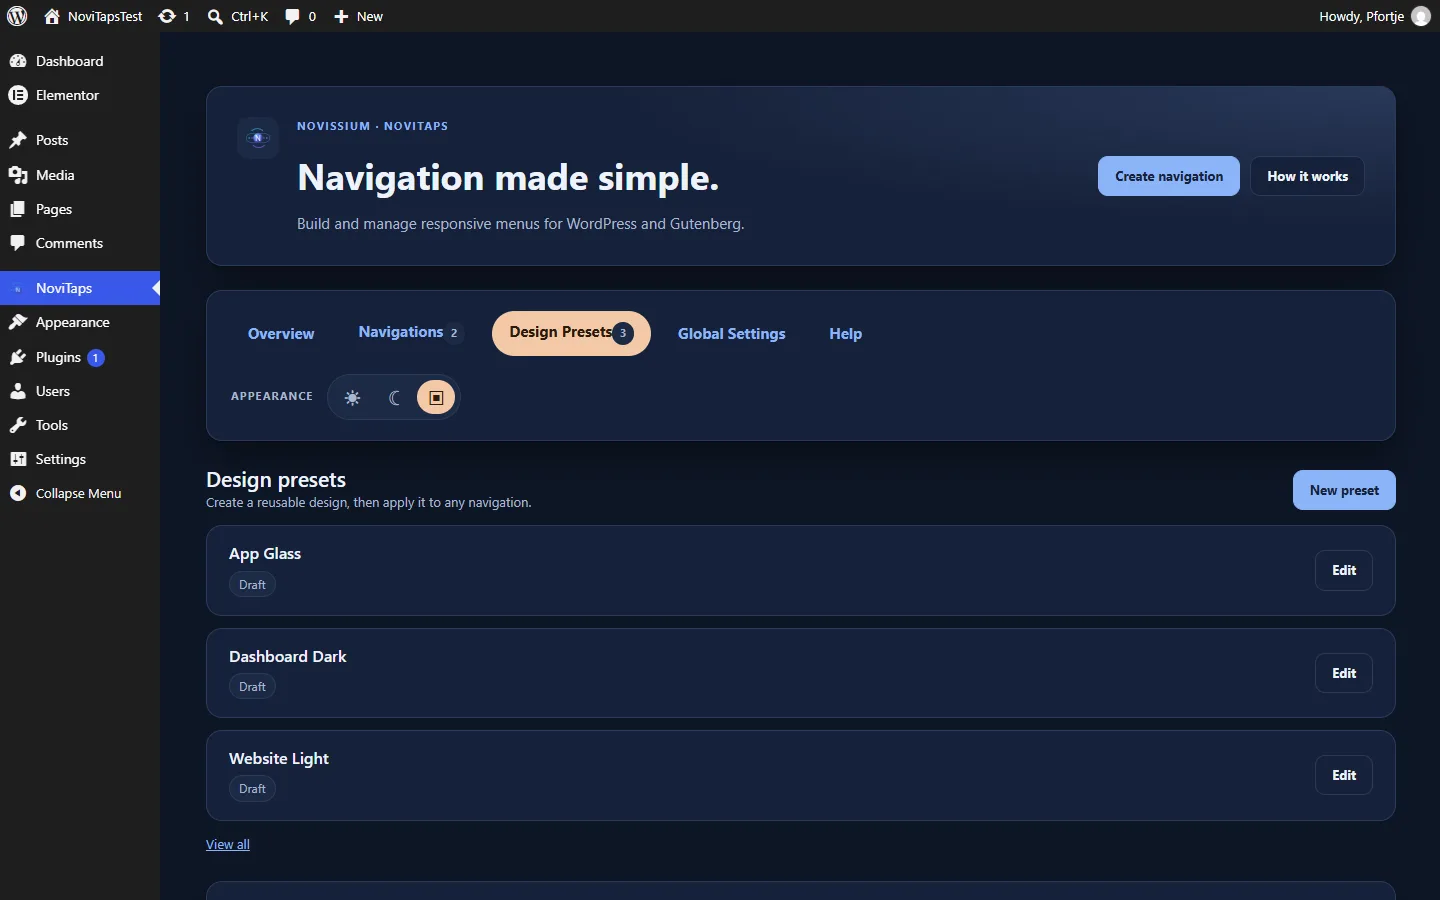
The starter designs are Website Light, Dashboard Dark and App Glass. You can also save your own design presets and duplicate presets.
- Open NoviTaps → Design Presets.
- Add a starter design, or create your own preset and save it.
- In the settings of a navigation (block, widget, shortcode or Global Settings), choose it under Design preset.
- Preview the design and adjust it as needed.
- Use Duplicate as draft to start a new preset from an existing one.
A design preset reuses styling. A Business navigation profile lets you configure a navigation once and reuse it throughout your website.
15. Create a mega menu
Requires Pro or Business.
Mega menus support expanded menu content. You can also use Elementor templates as content.
- Create the panel content as Mega content (see More tools in NoviTaps), or prepare an Elementor template.
- Choose Own entries as the menu source and open the entry that should show the panel.
- Select the content under Mega content or Elementor mega template.
- Choose the Mega menu layout.
- Check the menu on your website and the layouts used on smaller screens.
16. Use custom menu items and visibility rules
Requires Pro or Business.
You can create your own links and nested menu items instead of using a WordPress menu.
Each custom item can have visibility rules based on device, page, language, login status and user role.
- Under Structure, choose Own entries as the menu source.
- In Menu entries, select Add entry. Give each entry a Label and a Link, and choose a Parent entry to nest it. Drag entries to change their order.
- Optionally add an Icon, Description or Badge text, or highlight the entry as an action button.
- Set where the entry appears: Audience (for example logged-in visitors), Roles, Languages, Only on pages, Except pages and Devices.
- Check the result for the devices, pages, languages and visitors covered by your rules.
17. Save and reuse navigation profiles
Requires Business.
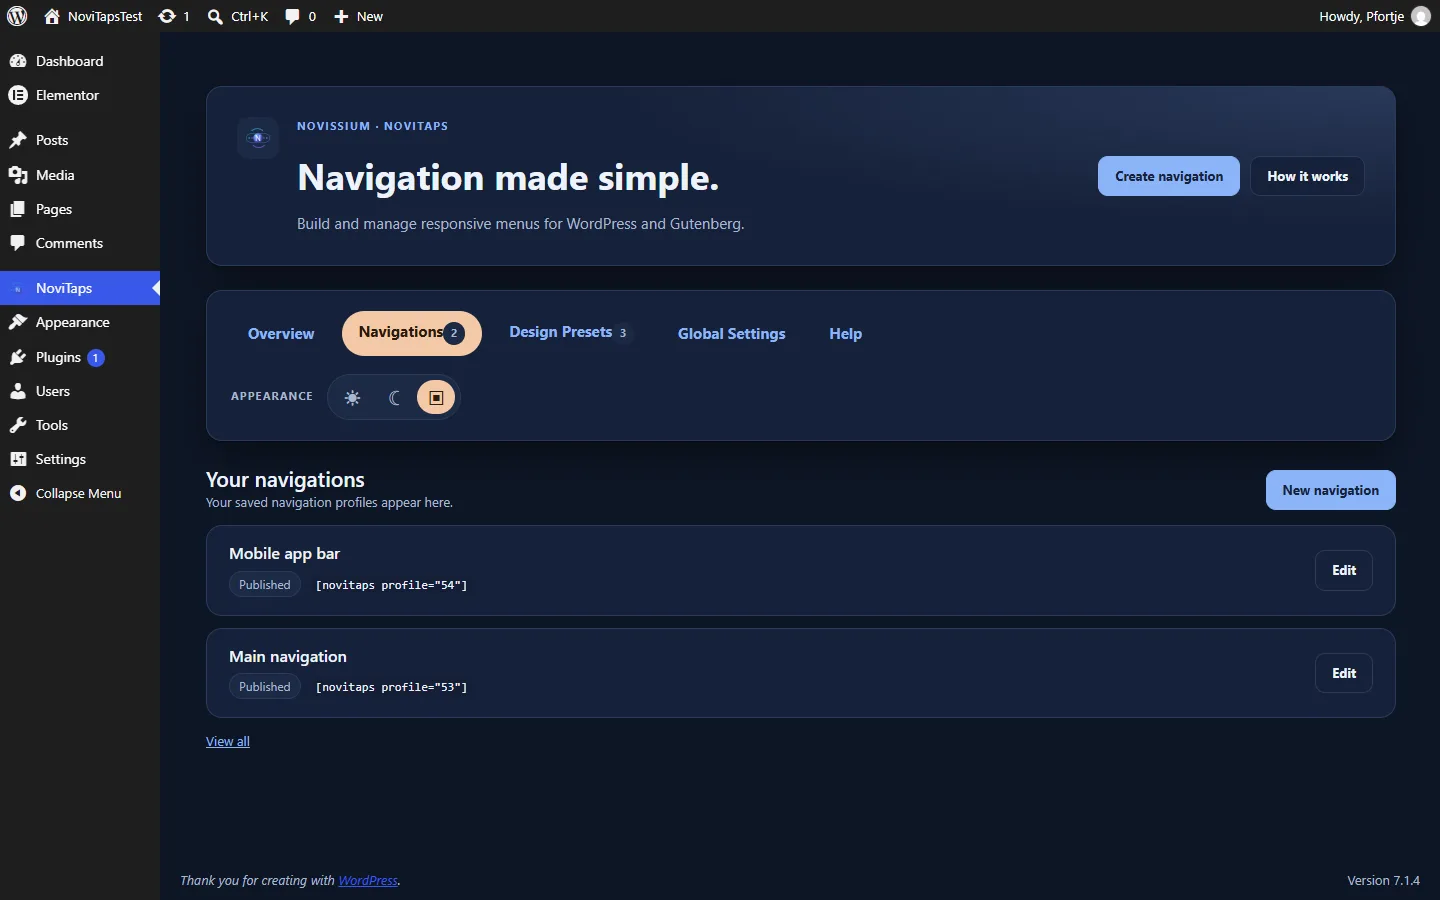
Saved navigation profiles let you configure a navigation once and reuse it throughout your website. Manage them in the navigation editor under NoviTaps → Navigations.
- Open NoviTaps → Navigations and create a new navigation.
- Give it a name, configure it and save it.
- Place it with the shortcode shown in the editor, for example
[novitaps profile="12"], or select it as the saved navigation in the NoviTaps block or Elementor widget. - Check each placement on your website.
Changes to a saved navigation apply wherever it is placed.
18. Place navigation automatically
Requires Business.
Business supports automatic placement in the header or footer without adding a block.
- In a saved navigation or in Global Settings, open More options.
- Set Automatic site placement to Before site content (header area) or After site content (footer area). Only where embedded turns automatic placement off.
- Check the result on your website at desktop, tablet and mobile sizes.
19. Transfer navigation between websites
Requires Business.
Use import and export to transfer NoviTaps navigation between websites.
- On the source website, export the saved navigation or design preset. You receive a NoviTaps export file.
- On the destination website, open Import / export, choose the NoviTaps export file and select Import as new draft.
- Review the imported draft, its menu source and its links before publishing it.
Imports always create a new draft. Existing navigations, menus and pages are not changed.
20. Check your navigation before publishing
- Confirm the menu source and follow each link.
- Open the submenus and check their alignment and behavior.
- Test the layouts on desktop, tablet and mobile.
- Use the keyboard to move through the navigation and check the visible focus state.
- Review the color modes and interaction states you use.
- Check any scrolling, sticky, anchor and bottom-bar behavior you have enabled.
- For Pro visibility rules, check the relevant devices, pages, languages, login states and roles.
- For Business, check saved profiles, automatic placement and any imported navigation where you use them.
21. Troubleshooting
A feature is visible but cannot be selected
In the premium plugin, functions of a higher edition show the edition that unlocks them. Check your active license in the Freemius dialog. NoviTaps Free does not include paid functions; a short note points to the paid editions.
One navigation differs from Global Settings
Check the settings in that navigation’s block, widget or shortcode. Individual settings override the corresponding global defaults.
A horizontal or dropdown menu becomes a hamburger on mobile
This is the automatic mobile behavior in Free, with a fixed breakpoint. Standard and higher provide separate tablet and mobile layouts and custom breakpoints.
I cannot select hover opening
Hover opening requires Standard or higher. Free supports opening by click.
A custom menu item is missing
Check its visibility rules for device, page, language, login status and user role. Compare them with the conditions under which you are viewing the page.
I cannot find the Elementor widget
Confirm that both NoviTaps and Elementor are active. Search for NoviTaps Navigation. Elementor Pro is not required.
For more answers, visit the FAQ.
22. Support
Email .
Include your NoviTaps edition, whether you use a block, shortcode, Elementor widget or automatic placement, and a short description of what you expected and what happened. Do not send passwords or license keys.
Back to: NoviTaps Help Center
Quick answers: NoviTaps FAQ
